can't take the heat

Cooling was a large issue for the VFR during 2018. This was especially true at Darley Moor (above) where the bike's temperature would rapidly climb above 100 degrees Celsius whilst heading back to the pit.


A quick answer was to remove the thermostat but by the time that became apparent to me, the worst of the hot weather was behind us so I never bothered.
Another was to add the missing front infill fairing which is designed to direct air into the race radiators on the 6x but this masks the bottom of the OEM radiator. I tried this but it didn't make things any better.
I looked into what twin radiator setups people were using. I say a few expensive custom jobs, second hand offerings from from bikes like the Suzuki TL1000R and new aftermarket offerings.
My answer was to buy a twin radiator setup for a Honda VFR400 NC30.
The top core is as wide and deeper than the 30 year old OEM core but not as tall.
The lower core would more than make up for any loss in frontal area but the depth alone would give more cooling surface area, not to mention they were new so would flow better.
For £100 I could get both cores with hoses which is stupidly cheap so I went and bought them.
First fitup
 The top radiator is all but a direct replacement. The lower mounts are missing on my bike, brobably long since rotten away, whist the top pops into place with the removal of the hose holder/spacer on the top left.
The hoses also just swapped straight in with them being a perfect match. This goes to show how similar the 400 and 750 V4 engines are in design.
 The lower radiator, when hung by the supplied hoses, sits at about the right place.
-800px-800x800.jpg) This can be confirmed by the location of the mounting points on the radiator being in good proximity to the two lugs in the forward cylinder head which are there to be mounting points for a radiator bracket.
This can be confirmed by the location of the mounting points on the radiator being in good proximity to the two lugs in the forward cylinder head which are there to be mounting points for a radiator bracket.
the lower feed hose that comes with the kit is too short. I opted to cut down the original hose to make that fit which did the job.
Compared the NC30 pictured on the left, things looked about right.
 This was starting to look like a quick and easy fit till I tried to fit the forward fairings.
The sides were fine but I couldn't fit the belly pan as the radiator would sit too low and far forward.
Consulting images of the 6x proved unhelpful. My short term answer was to simply mount the radiator higher which would allow the lower fairing to be attached.
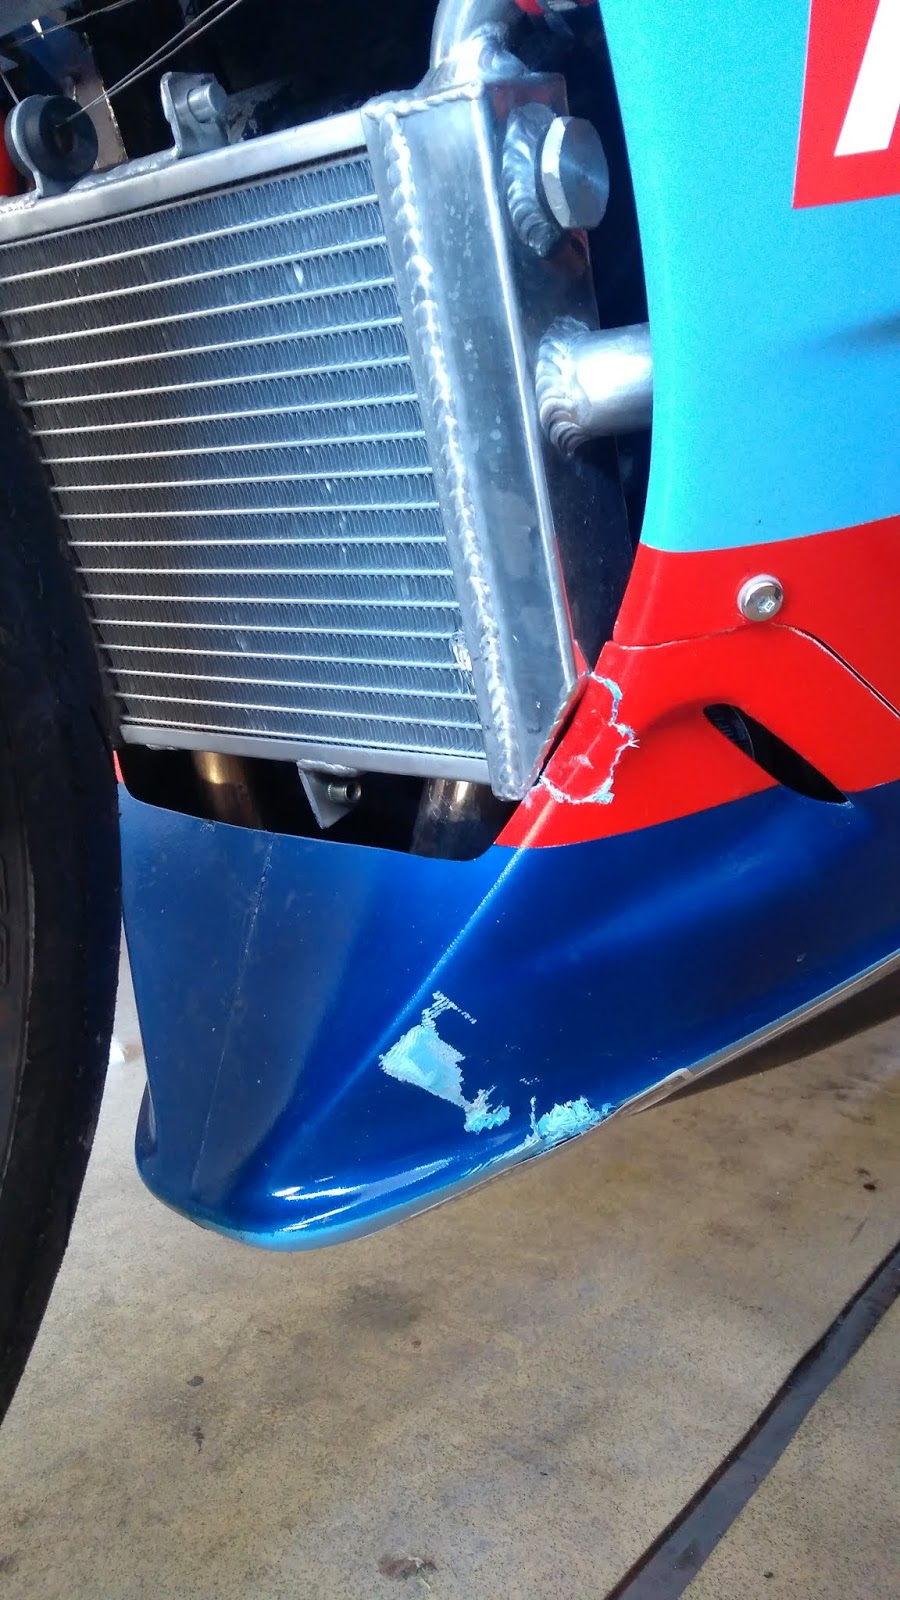
The down sides to this are clear from the image on the left.
The radiator is pushed ever further forward and is proud of the lower fairing slip still.
You can also see that the radiator hose on the left of the bike is struggling to hold its shape which would result in poor coolant flow making this whole venture pointless.
Checking the suspension travel proved that this mounting position would be doable even if it was still less than ideal.
Either way it gave me a large frontal area for cooling and my bike was now needed to go on display at the Lincoln show so I loaned it to the Witham group for their stand where it was transported off.

Unfortunately, during transit to the Lincoln show, the bike rolled forward on its front wheel chock which took some chunks out of the lower fairing and dented the new radiator. Bloody brilliant!
By now I had run out of time till the next race meeting so returned to the old radiator, which I had cleaned with wire locking, degreaser and a jetwash, with new hoses wherever possible. I stuck with this setup till the end of the season.
Once the racing season was done, the bikes started to get some delayed upgrades. Outcame the shiny new radiators again and back I went to head scratching.
Back in the shed
 I now had an ally in the shape od David Williams who was building his own VFR750 to enter in the post classic superstock 750 class in the CRMC.
He also found over heating issues (in winter!) and decided to go the same root as me with the twin radiator setup. Unlike me, his fit with ease, requiring the munimum of faffing.
His early style fairing was clearly lending itself to being an easier fit leaving me to muse on as to how I was going to make this all go together.
As it happens, the answer came from this very blog. A helpful reader pointed out that many race RC24's had their fairings set further forward.
I studied some images and although I couldn't see any clear examples of this exactly, I did think that maybe my fairing was pivoted too far anti-clockwise from the nose fairing top bolts. By dropping the rear slightly, it opened up a gap in the belly pan, allowing the lower radiator to fit. Result!
 A loose test fit proved the theory worked so I went about building some brackets.
With the top radiator bolted up at the top, I measured for an L bracketthat would drop down to the rubber mount of the lower radiator.
This was made and roughly shaped before offering up. Satisfied this would do the job I finished the shaping, drilled an 8mm slot in one end and welded the other with my Rtech digital tig 170. I was quite chuffed with the results and my welds stand up quite well to the Chinese chap who built the radiator in the first place.
Whilst here I lopped off the lower bracket as I didn't think I would use this. I'm still not sure if this was a good idea. The fan brackets were left on as they are tiny and the chance of damaging the radiator was too great.
After rechecking I had not made a pigs ear of that (thankfully not) I looked at the bottom bracket.
 There is a hole in the middle of the front heads where a bracket is supposed to go but there was no way I was getting a tap into that due to everything else in the way so I decided to use the unused forward lower engine mount for this purpose.
Some 8mm thick walled tube was bent to shape and an the bracket I had lopped off the top radiator was drilled and welded onto one end. the other end was drilled out and tapped for a 5mm bolt . on the outside, an old cable boot from a brake pad ware sensor was warmed up and slid over the tube to act as a dampener and stop for the new bracket.

I removed the fan brackets from the back of the lower radiator as these were impacting the exhaust. The new bracket could now be fit up loose with the radiator and everything manipulated into place before tightening.
I was pleasantly surprised to find everything roughly in the right place. the lack of a lower bracket on the upper radiator was made up for with some wire locking on the fan brackets. There isn't a lot of tension on them, they are just there to prevent it from trying to swing forward under braking.
With the final position for the radiators now chosen, I could cut the radiator hoses to best fit inside the fairing without pinching.
 I then stuck a variety of different brand jubilee type clips to the hoses thinking I really need to go tot he hose shop and buy a box or two of proper jubilee clips in the right size!
Once I was content that the radiator fit was basically finished I now had to go back to the fairing fit part.
The nose fairing was loosely bolted on. The aluminium cup spacers now came into their own as, unline drilled bar, the bolt could freely pivot inside the spacer without it tipping and looking untidy. Well more so than normal that is.
 The nose, side panels and belly pan were then connected to one another with the Dzus fasteners. This let the whole lot pivot from the nose fairing upper bolts.
I could now wedge a WD40 can cap between the belly pan and the front wheel putting the fairing in place and well clear for suspension travel.
As you can see on the right I then went and fit the 6x style lower fairing infill which helps direct air into the radiators. I had previously fit this so it was a simple case of turning the entire garage over looking for the bits before givin up and digging out fresh Dzus bolts which I had removed from the fairings when I stopped using it last time.
The fit up looked good but clearance on the lower radiator was pushing the fairing too far forward so a trim was needed.
 Fitting the infill was a pain in the ass so I opted to swing the fairing forward and trim it still fitted. This allowed me to trim and check as I went along with the biggest cost being a bit of garage yoga and a lot of dust everywhere.
 Things were improving but time was wearing on and I had some dinner to sort out.
The following day I got back to it.
It was clear that I was going to need to make some more drastic cuts into this infil panel so I marked it up as best I could and popped the thing off.
The corners were drilled out with a hole saw to give a radius and an access point so I could get in there with jigsaw. The edges were tidied up with sand paper leaving a good enough finish. I was surprised how well that went as I fully expected the whole thing to explode into a million little fibreglassy bits.
With the added clearance I now not only had better airflow but the fairing now care back a lot further. I was now happy I had enough clearance.

The fairing was rebuilt and help in place so I could figure out wnat I would need to do with brackets.
The right hand side lower one could be rotated and made to fit which made life easy but the left would need to be replaced.
I did the same as last time where I flattened the ends on some tube and bent them to shape. The biggest change was using rivnuts rather than nutplates which are a lot more secure and look a damn sight better.
That only left the belly pan to sort out that was now sat ridiculously low.
 First I cut the exhaust cutaways deeper till everything sat flat again; then I just had to mark up and drill the side mounting screws. With that done I trimmed the excess away and now that belly pan looks even better. Another side bonus was that; in rotating the fairing forward, it opened up the clearance on the crazy exhaust bends that had been causing me heat damage problems. Another little win!
Running the bike up showed everything worked witout leaking water everywhere but the real test
had to wait till April when we hit Darley Moor for round one of the CRMC.
The bike was fantastic heat wise. The temperature was pretty steady around 85-95 whenever I glanced at the instrument cluster. Unfortunately; under heavy braking the front wheel does just touch the radiator. I should be able to sneak a few mm back I hope which will boost the old confidence under braking!


I've noticed it looks to me like the HRC boys slid the entire front fairing a bit forward compared to its location on a stock RC24. On a side view of a producion bike, you cant see much frame rail between the trailing edge of the front fairing and the fuel tank. But on a 6x, you see what looks like close to a 50mm gap. Have been wondering why they might have done this. Might be helpful in this situation. I am planning the same radiator setup on mine. Will be buying them shortly. Helpful post by the way, thanks much.
ReplyDeleteI had not noticed this, I shall investigate further. Many thanks for the heads up!
DeleteHi I've just come across this, it's very interesting, thank you, I'm just doing a vfr build, I think I've got the same rear fairing, any help on fitting it please? Thanks Si.
ReplyDeleteI'm sure you found this already but I already covered this a bit in a previous blog. Basically you need to either make a new subframe (not allowed in SS) or do what I did and beef it up with a box section additional frame.
Deletehttps://vfr750rc24.blogspot.com/2018/05/getting-all-dressed-up.html
Here is some more detail https://vfr750rc24.blogspot.com/2020/01/more-bits-n-bobs.html
Delete